Part 4 Drawing a Helix Spline
In this Task
- A new layer structure will be created for Part 4.
- A line and circle will be used to create a Helix.
Associated Tasks
- Using the Translate tool to move an object.
Before you Start
- Open the drawing which was saved from the previous Session or use the [sample drawing](https://www.tricad.co.za/2020-1/SharkCAD/Content/Resources/Drawings/Session 4 Sketch%26Model.sfx) for this Task. More…The sample drawing for this session contains the 2D Sketch and the 3D Model. Frequently, these 2 layers are superimposed. Use the Concept Explorer to control the display of the layers. Create your own layers if you wish to produce the design from scratch or pan to an unused area of the editor.
- Turn the view to Isometric.
Take Note
- When drawing a new part in the editor, the layers of the existing parts can be switched on temporarily to check their occupancy in the editor. If possible, new parts should be drawn in a space not occupied by other parts.
[ ](https://www.tricad.co.za/2020-1/SharkCAD/Videos/2d3d-07-01 sketch.mp4 "Internet Connection Required")
Layer control
When using the sample drawing for this Session, the sketch and model layers for Parts 1, 2 and 3 have already been drawn on specific layers. For this task, make sure the Sketch layer for Part 4 is displayed and the Model layer for Part 4 is activated as the current layer.
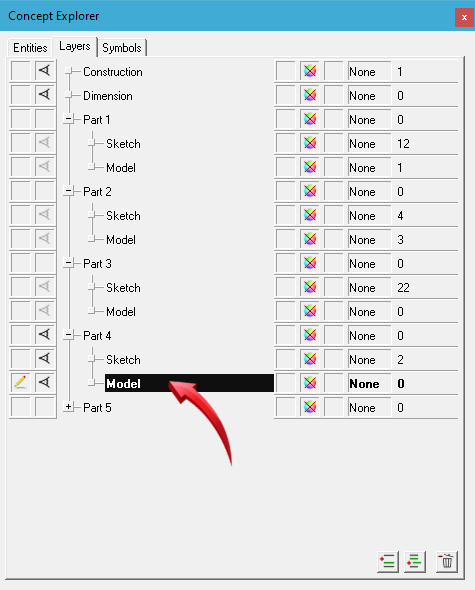
Viewing and activating Part 4 Model as the current layer
Helix Spline

Draw | Spline | Spiral Spline – option Helix Spline

This draw tool turns a curve along an axis on the surface of a cylinder or cone, having a fixed upward angle and constant pitch.
A cylindrical helix would have a draft angle of 0; a conical helix would have a draft angle of a fixed degree, creating an inward or outward taper.
When using the sample drawing for this Session, the sketch shown below is displayed on the Part 4 Sketch layer. The dimensions shown in the image below are for reference only. The sketch objects below are viewed from Top view. Right click in the editor and select View > Top.

Line drawn to Length 48, Angle 0 (viewed in Isometric)
Turn the view to Isometric, then select the Helix Spline tool from the toolbar or use Draw > Spline > Helix Spline.
Input the following information into the edit fields.

At the prompt > Select start and end of helix, target each endpoint of the line. The result is shown below.

Helix created from start and endpoint of line
Please Note :
A 2-dimensional spline can be created without the circle, however, the circle will be used to create a 3-dimensional sweep in the next task.
Drawing Layout and Printing
Should you wish to print your drawing at this stage, please refer to Drawing View Layouts and Printing.
