Layer Control
In this Task
- Layer control using the Concept Explorer will be discussed and demonstrated.
Associated Tasks
- Creating a new layer.
- Controlling layer visibility.
Before you Start
- Open the drawing which was saved from the previous Session or use the [sample drawing](https://www.tricad.co.za/2020-1/SharkCAD/Content/Resources/Drawings/Session 1 Sketch%26Model.sfx) for this Task. More Info :The sample drawing for this session contains the 2D Sketch and the 3D Model. Frequently, these 2 layers are superimposed. Use the Concept Explorer to control the display of the layers. Create your own layers if you wish to produce the design from scratch or pan to an unused area of the editor.
- The layer of new objects will be drawn on the currently activated layer. A layer is made current using the Concept Explorer.
- Objects which exist in the editor can be selected and moved to another layer using the Inspector.
Take Note
- Layers which have been switched off still constitute part of the sketch. Take care not to move objects which are visible without their associated objects on another layer.
Layer Control
Window | Concept Explorer
New layers are created so that specific object properties such as color, visibility etc, can be more easily controlled.
When a new layer is created and activated as the current layer, all subsequent objects drawn in the editor will automatically be drawn on this layer.
Objects which were previously drawn on another layer can be moved to a new layer using the Inspector.
Concept Explorer
The Concept Explorer is a utilities manager which allows control over object properties such as layer, color, linetype etc. It also provides a selection of symbols which can be conveniently inserted by dragging into the editor.
Note : This step is not necessary if you are using the sample drawing for this Session.
From the Window menu, select Concept Explorer. Make sure the Layers tab in active. Select the option to Create a New Top Level Layer, shown by the arrow below.
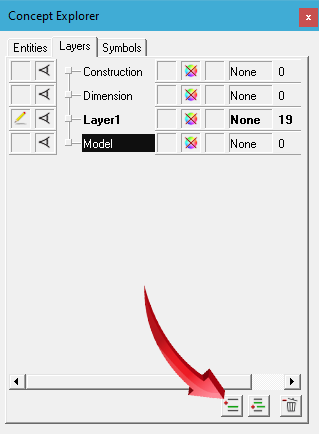
Creating a new top-level layer
Click onto the newly created layer, then input a new name for this layer. In this example, the layer name ‘Model’ is used, shown below.
Activate this layer as the current layer, shown below. Activating a layer as the current layer forces forthcoming objects to be on this layer until changed by the user.

Activating the Model layer as the current layer
Layer Name
The name of a layer can be changed at any time. In this task, the name of the default layer, Layer1 will be changed to Sketch.
Click onto the layer name shown below and input the name Sketch.

Changing the layer name
Layer Visibility
The display of objects drawn on layers is controlled using the Concept Explorer. In this task, the layers on which the dimensions were drawn will be disabled, leaving only objects drawn on the Sketch layer.
Deselect the visibility option of the Dimension layer, shown below.

Switching off the Dimension layer
The layer Sketch will be the only layer visible in the editor, shown below.

