Dimensions & Center Marks
In this Task
- Dimensions and Center Marks will be added to the sketch.
Associated Tasks
- Horizontal, Vertical and Radial dimensions.
- Center Marks with an axis overlap.
Before you Start
- All dimensions require snaps to be activated for accuracy.
Take Note
- Dimensions are automatically created on a layer named Dimensions if the ‘New Using Wizard’ drawing setup was used.
- Dimension positions can be adjusted after insertion.
[ ](https://www.tricad.co.za/2020-1/SharkCAD/Videos/2d-01-10 sketch.mp4 "Internet Connection Required")
Dimensions & Center Marks

Draw | Dimension
Annotation detail such as dimensions and center marks can be added to the sketch if necessary.
Annotation is usually added to the Dimension layer, a default layer when starting a new drawing from the Wizard.
Dimension features are formatted prior to insertion using the Inspector.
Dimension features are modified after insertion by selecting the dimension, then using the Inspector to modify the feature.
All dimensions in the drawing can be selected using right click > Select All > Dimensions & Text.
Center Marks

Draw | Dimension | Center Mark Dimension
This dimensioning tool inserts a center line mark to represent the center of a circle or arc.
This feature is usually added to the Dimension layer, a default layer when starting a new drawing from a template.
First remove any lines which previously represented center lines, typically lines which were created as parallel, offset lines. This is done by selecting the lines, then using the Delete keyboard key.
The sketch should resemble the illustration below.

Sketch with center lines removed
To create a center line which extends beyond the circle by a specified distance, select the Center Mark tool, shown above, then input the distance into the Axis Overlap field. In this example, an axis overlap of 5 is used.
Select the Center Mark tool from the Dimension toolbar and input 5 into the Axis Overlap field. Select the larger circle shown below.

The result is shown below.

Center Mark with Axis Overlap of 5
Repeat this for the remaining circles, decreasing the Axis Overlap if necessary. The result is shown below. In the example below, the smaller circles have an axis overlap of 3.

Inserting center marks onto the circles
Horizontal Dimension
Draw | Dimension | Horizontal Dimension
This tool creates a dimension between two points in a horizontal plane.
Select the Horizontal Dimension tool from the toolbar or use Draw > Dimension > Horizontal Dimension.
Then select the 2 points shown in the illustration below. The dimension line and text should appear in a position similar to the illustration below. Dimension lines and their associated text can be moved after insertion.

Horizontal dimension placed between two endpoints
Repeat this, inserting all horizontal dimensions so that the result is similar to the illustration below.
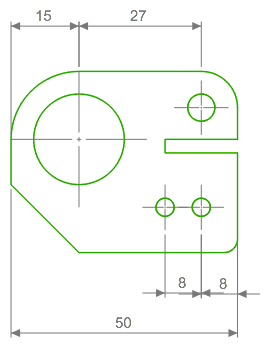
Inserting horizontal dimensions
Vertical Dimensions

Draw | Dimension | Vertical Dimension
This tool creates a dimension between two points in a horizontal plane.
Select the Vertical Dimension tool using the toolbar or use Draw | Dimension | Vertical Dimension
Using the same method as above, insert a vertical dimension using the points shown in the illustration below. Use similar points to insert vertical dimensions for the remaining linear dimensions shown below.

Inserting vertical dimensions
Radius & Diameter Dimensions

Draw | Dimension | Radius/Diameter Dimension
This radial dimension tool creates a radius or diameter dimension on an arc or circle.
The radial dimension can either by drawn using the inside or outside option.
Using either the Radius or Diameter Dimension tool, add radial dimensions to the sketch so that the result is similar to the illustration below.

Horizontal, Vertical & Radial Dimensions
Drawing Layout and Printing
Should you wish to print your drawing at this stage, please refer to Drawing View Layouts and Printing.
